I don't know how I'm going to fit them all here, but hopefully I'll be able to stuff all 100 or so images. I've got quite a few doodles from this semester. Even though it's been rough, to be honest I LOVED this semester.
I love how it pushed me to draw and expand my skill.
I love how it empowered me with giving me great digital tools, so I wont be afraid to play with lighting and color and texture. Things I would be too afraid to do on a 40 hour painting.
I love the many friends that I met, and professors I got to call friends.
Wednesday, December 14, 2011
Illustration Assignment: Rimblade Menu Background
This is supposed to be for an Android phone screen. It's the background for our Main Menu. It's up to the Art Director if he actually wants to use it however.
The Goal here is to enlarge the menu section


The Goal here is to enlarge the menu section
Image:

Reference: I was heavily influenced by Doug Chiang's Mechanika work, which I am perfectly envious of. The two illustrations are his.


Wednesday, December 7, 2011
Assignment: Sleep Disorder
Assignment: To illustrator a sleep disorder.
 I've chosen Apena. While a few of my fellow artists and class mates took night terrors, insomnia, and narcolepsy and did great with them, I wanted to step away from awesome teddy bears fighting off monsters. I also wanted to see if I could strech my style a bit and see if I could grow in my digital ability. This thumb nail is the result.
A long time ago, I used to have a roommate who had apena. I'm not kidding, he shook the windows with that mighty nose. Kept my other roommates and me up every night for hours. Blau, this is for you.
Friday, November 18, 2011
Illustration Assignment: Advertising Poster- Rimblade
Rimblade in the android market place at current.This is for my Intro to Illustration and my Digital Illustration class.
My task is to create an advertising related illustration. Since our (Gremlin Games) Android Mobile App game 'Rimblade' is in beta right now and available for download AND in need of some limelight, I thought I'd do the Android splash page and icon for my assignment.
This is where the piece will be displayed:

Refined Concepts:


Wednesday, November 16, 2011
Assignment: Narrative - Happiest person on Earth for Christmas
Assignment: Draw the happiest person on earth with a Christmas theme.
I believe the intent here is to draw Santa as the happiest man on Earth. To be honest I can't. Well, not can't, but wont. I know that for Christmas Santa isn't the happiest man on earth, but it's people like Hannah and her dad, Master Sergeant Joesph Myers.
There is a current fad going around the internet of showing soldiers homecomings in big ways and the OUTPOURING of emotion that follows, when I was asked to portray the 'happiest' person on earth, this is what I thought of. Basically.. tears. Not just tears, continual uncontrollable sobbing because these people are so happy.
So I want to say to you daughters of soldiers out there, YOU inspire ME.
I cried the entire time I painted this. I cried because I am so happy for YOU.


Inspiration:


Feel free to take a look at where I pulled these from:
http://www.youtube.com/watch?v=uSMlIM9zLio
http://www.youtube.com/watch?v=uFLBR87naoU
http://www.youtube.com/watch?v=Ygt9Wizh9mo
http://www.youtube.com/watch?v=IZWV57rr1hI
http://welcomehomeblog.com/
http://www.youtube.com/watch?feature=player_embedded&v=JzvKFN7G_eo#!
http://www.youtube.com/watch?v=W8j21QtHXvA
http://www.youtube.com/watch?v=GAXyB6FbCuc&feature=related
Round of Thumbs 1 - for ideas, composition and positioning.


Monday, November 7, 2011
Assignment: Narrative - "Nothing Ventured.."
Assignment: The goal is to create an Narrative based illustration based on the phrase: "Nothing Ventured, nothing gained."
I went through a variety of ideas, everything from a skydiver, to a sleeping beauty style prince, to a guy looking through a portal. (see below) Eventually I went with a portal, but mostly because I loved the idea of playing with the lighting from the portal. Enjoy!


Gosh I've been sick lately. So it's been extra difficult to get this all done.
Some early ideas I sketched out in the process of figuring out what I wanted to do:


Assignment: Self Characture
Assignment: Take a picture of myself using the iMac's Photobooth option in class and characterize it. ( I just made that word up)
Wednesday, October 26, 2011
New Technique: Layer Options
Technique:
Purpose: Changes a layer in severe ways to apply a type of color to an image.
Options:
--------
Overlay:
Purpose: Changes a layer in severe ways to apply a type of color to an image.
Options:
- Normal:
- Dissolve:
- Darken:
- Multiply: Turns the layer into a transparent layer, and applies that layer to the image. The end result is the layer will apply a kind of texture to an image like flames. (see Image)

- Color Burn:
- Linear Burn:
- Darker Color:
- Lighten:
- Screen:
- Color Dodge:
- Linear Dodge:
- Lighter Color
--------
Overlay:
Monday, October 24, 2011
New Technique: Transforming with the warp tool
Technique:
1. Select an area with the lasso
2. Cntrl - T to transform
3. Right click in the transform area and select an option.
There are several useful options within that transform menu. For example:
As you can see in the above I took how I look in Digital Illustration class (it's an 8am class) and used it to deform my face into something even more humorously bad. I 'warped' my lip, 'rotated' my whole face, 'distorted' my eye, and did a little 'perspective' to enlarge the top of my head and shrink the lower part of my head so it looks like I'm slightly leaning forward.
Note: The cross hair is the point that the image can be rotated around. so the cross hair can be moved and the image rotated around that point.
1. Select an area with the lasso
2. Cntrl - T to transform
3. Right click in the transform area and select an option.
There are several useful options within that transform menu. For example:


- Rotate
- Perspective
- Warp
- Distort
As you can see in the above I took how I look in Digital Illustration class (it's an 8am class) and used it to deform my face into something even more humorously bad. I 'warped' my lip, 'rotated' my whole face, 'distorted' my eye, and did a little 'perspective' to enlarge the top of my head and shrink the lower part of my head so it looks like I'm slightly leaning forward.
Note: The cross hair is the point that the image can be rotated around. so the cross hair can be moved and the image rotated around that point.
Sunday, October 23, 2011
Assignment: Play around with Color - Mitt Needs a Poster
Assignment: Play around with colors on a pre-existing picture.
I noticed a lot of other people were pulling random images of interesting animals off the net as we worked in class, and I kinda wanted to do something different and a bit useful. I follow Mitt Romney and figured he needed some type of poster design. Who knows, maybe they might pick up the finished project, and I've have a country of liberals attempting to pick apart all my flaws? While not entirely complete, this is what I've come up with so far.
I'm undecided on the text. Should it be SOLVE, FIX, (or some variation, ie: solver, solved, fixer?) or something else?

Anyrate.. here it is a previous version.

Saturday, October 22, 2011
Illustration Assignment: Dune Bookcover cont
Intro to Illustration Assignment: DUNE book cover.
So far, I've finished up the three options and gotten the votes from my class. I thought I'd present them here before we do one final change up considering they are due this week. These three I've narrowed down from almost 25 thumbnails.
So the three so far: Skull in the Sand

Dune Footprints:
 Paul's Moment:

So far, I've finished up the three options and gotten the votes from my class. I thought I'd present them here before we do one final change up considering they are due this week. These three I've narrowed down from almost 25 thumbnails.
So the three so far: Skull in the Sand

Dune Footprints:


Monday, October 17, 2011
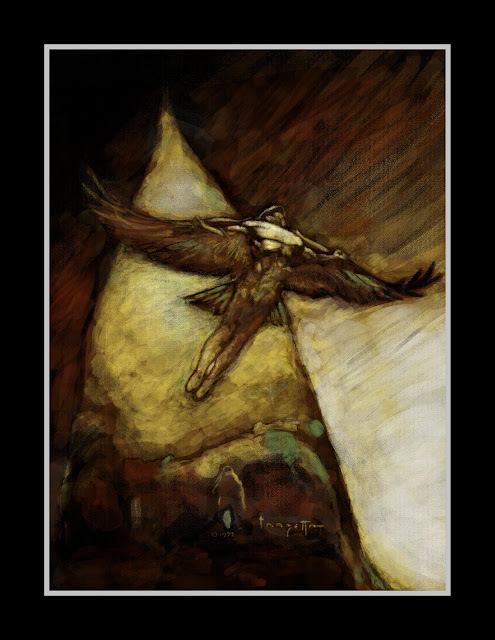
Assignment: Copy a Master - Frank Frazetta
Assignmet: This is the copying a Master in color with texture and stroke as best I can.
I've spent quite a bit of time on this, and painted until my contacts dried out and my finger cramped so much I couldn't use the stylus anymore. Ugh. I really enjoyed the work though and so I want to be great. I could work on this for quite a long time. And I did. The finished result is a the bottom.
Techniques used:
This was a bit difficult as it's an "Oil Lift off" painting. Doing it digitally, I decided to use layers to my advantage. What took me hours to figure out, is that the top layer should be my black instead of the bottom as on previous paintings. Putting the black on top and then using a slightly translucent eraser tool I customized for the job, to erase down to layers to the correct area colors gave me that oil lift off feel.
So I have in layers:
1. Black
2. Green/Blue
3. Red
4. Yellow
5. White
I still feel like I could work some more on it, but as I've heard in the art world, the image is done 20 minutes before it's due.
Original:

And now the Final image:


Assignment: Our next assignment will be to copy one of the create masters. This is similar to the Vitruvian man copy assignment, but now with the experience I've had painting, I'm supposed to be able to mimic as much of the original artists as I can.
 Since
I'm feeling a bit cocky, and entirely insane, I've chosen Frank
Frazetta. One of the most influential people on the SciFi and Fantasy
genre. While I don't particulary lean toward his style, (I'm more of a
Brom, Jock, Karl Kopinsky, Paul Dainton fan myself) it doesn't get more
'master' for the world of geek than the 'original' Frank. That said,
that guy REALLY loved his wife. If you look closely almost 90% of the
women
Since
I'm feeling a bit cocky, and entirely insane, I've chosen Frank
Frazetta. One of the most influential people on the SciFi and Fantasy
genre. While I don't particulary lean toward his style, (I'm more of a
Brom, Jock, Karl Kopinsky, Paul Dainton fan myself) it doesn't get more
'master' for the world of geek than the 'original' Frank. That said,
that guy REALLY loved his wife. If you look closely almost 90% of the
women
The problem is I'm having trouble deciding which of his pieces to do. I can't really show TOO much boob as I'm hoping to display this in a relatively family involved environment, but I also want to capture him as best I can with out going too complicated and beyond my ability. As it is, I'll likely be streching here.
I've narrowed it down to three options (.. okay five):


I've spent quite a bit of time on this, and painted until my contacts dried out and my finger cramped so much I couldn't use the stylus anymore. Ugh. I really enjoyed the work though and so I want to be great. I could work on this for quite a long time. And I did. The finished result is a the bottom.
Techniques used:
This was a bit difficult as it's an "Oil Lift off" painting. Doing it digitally, I decided to use layers to my advantage. What took me hours to figure out, is that the top layer should be my black instead of the bottom as on previous paintings. Putting the black on top and then using a slightly translucent eraser tool I customized for the job, to erase down to layers to the correct area colors gave me that oil lift off feel.
So I have in layers:
1. Black
2. Green/Blue
3. Red
4. Yellow
5. White
I still feel like I could work some more on it, but as I've heard in the art world, the image is done 20 minutes before it's due.
Original:

And now the Final image:

To prep I did a value study and a pre-critiqued image. Which are also below if you want to see the process.


Assignment: Our next assignment will be to copy one of the create masters. This is similar to the Vitruvian man copy assignment, but now with the experience I've had painting, I'm supposed to be able to mimic as much of the original artists as I can.
 Since
I'm feeling a bit cocky, and entirely insane, I've chosen Frank
Frazetta. One of the most influential people on the SciFi and Fantasy
genre. While I don't particulary lean toward his style, (I'm more of a
Brom, Jock, Karl Kopinsky, Paul Dainton fan myself) it doesn't get more
'master' for the world of geek than the 'original' Frank. That said,
that guy REALLY loved his wife. If you look closely almost 90% of the
women
Since
I'm feeling a bit cocky, and entirely insane, I've chosen Frank
Frazetta. One of the most influential people on the SciFi and Fantasy
genre. While I don't particulary lean toward his style, (I'm more of a
Brom, Jock, Karl Kopinsky, Paul Dainton fan myself) it doesn't get more
'master' for the world of geek than the 'original' Frank. That said,
that guy REALLY loved his wife. If you look closely almost 90% of the
womenThe problem is I'm having trouble deciding which of his pieces to do. I can't really show TOO much boob as I'm hoping to display this in a relatively family involved environment, but I also want to capture him as best I can with out going too complicated and beyond my ability. As it is, I'll likely be streching here.
I've narrowed it down to three options (.. okay five):


Wednesday, October 12, 2011
New Technique: Changing Lighting, and Selective Color
New Technique: Changing the Lighting
Hotkey: Cntrl - L
This tool can be used to make the lights lighter, and the darks darker. It gives a graph of where the selection falls in the lighting category.
This can be done in a layer, so the best way to change an area is to cut it out with the lasso tool, and paste it on another layer, then mess with the lighting.
New Technique: Selective Color:
Layer - > Adjustments -> Selective Color
Hotkey: Cntrl - U
Much like the light tool, this tool can be used to change the individual colors in an area. So a selection can be made more red, or more blue. Very useful for fine tweaking an image.
New Technique: Mixer Brush (How to get an oil paint effect)
Technique:
Hold down the paint brush symbol (black arrow at the bottom) for the option to change to the mixer brush.
Mixer brush options: at the top of the screen are a few options to change the bush too: Dry, very wet; clear brush, load brush.
 Mixer will only mix with colors on the current layer, unless 'sample all layers' box is checked. This is a bad idea. Keep it on the current layer.
A few things: The mixer brush actually 'runs' out of paint, as the red mark on the right shows. You can actually not load your brush with anything and just mix. (Two box options at the top)
Note: Personal brushes can be loaded into the mixer tool.
Hold down the paint brush symbol (black arrow at the bottom) for the option to change to the mixer brush.
Mixer brush options: at the top of the screen are a few options to change the bush too: Dry, very wet; clear brush, load brush.

A few things: The mixer brush actually 'runs' out of paint, as the red mark on the right shows. You can actually not load your brush with anything and just mix. (Two box options at the top)
Note: Personal brushes can be loaded into the mixer tool.
Tuesday, October 11, 2011
New Technique: Drawing over Reference
Well, this may not be new to most people, but it should be here as a note of the class.
Technique:
Find the image(s) reference.
Resize the image to fit the dimensions of the work.
Paste the resized image into the actual art work, and move to the correct location.
Free transform the image (Cntrl-T) to fine tune the image to the correct porportion, angle, etc.
Create a new layer over it, and make it white. Make the white layer less opaque, more translucent.
Create another layer and label it "Line Drawing', and being sketching over this layer.
I used the technique for my Dune kneeling guy.

Monday, October 10, 2011
Assignment: Give it some texture, Dunes and sky
Assignment: Create an interesting painting using multiple textures and layers with the out of the way color changing items to effect a modern art piece.
 Yup.. no idea what I'm doing here cept creating texture.
So the end goal here is a moon lit desert scene. I think this version is a bit too dark though.

And this is even more interesting.....
I really like that after glow effect over the mountains, but goodness knows how I could reproduce it. I lightened things up quite a bit, but I still really don't like it. It looks like a 3 year old vomited while having a epileptic seizure in photoshop...
So in the end This became the final, after a LOT of reworking, but I think I'm happy with the result:

Subscribe to:
Comments (Atom)